Quickstart: Cytoland
Estimated time to complete: 15 minutes
Learning Goals
- Download the VSCyto2D model and an example dataset containing A549 cell images.
- Run VSCyto2D model inference for joint virtual staining of cell nuclei and plasma membrane.
- Visualize and compare virtually and experimentally stained cells.
Pre-requisites
Python>=3.11
Introduction
Model
The Cytoland virtual staining models are a collection of models (VSCyto2D, VSCyto3D, and VSNeuromast) used to predict cellular landmarks (e.g., nuclei and plasma membranes) from label-free images (e.g. quantitative phase, Zernike phase contrast, and brightfield). This quick-start guide focuses on the VSCyto2D model.
VSCyto2D is a 2D UNeXt2 model that has been trained on A549, HEK293T, and BJ-5ta cells. This model enables users to jointly stain cell nuclei and plasma membranes from 2D label-free images that are commonly generated for image-based screens.
Alternative models are optimized for different sample types and imaging conditions:
- VSCyto3D: 3D UNeXt2 model for joint virtual staining of cell nuclei and plasma membrane from high-resolution volumetric images.
- VSNeuromast: 3D UNeXt2 model for joint virtual staining of nuclei and plasma membrane in zebrafish neuromasts.
Example Dataset
The A549 example dataset used in this quick-start guide contains
quantitative phase and paired fluorescence images of cell nuclei and plasma membrane.
It is stored in OME-Zarr format and can be downloaded from
here.
It has pre-computed statistics for normalization, generated using the viscy preprocess CLI.
Refer to our paper for more details about how the dataset and model were generated.
User Data
The VSCyto2D model only requires label-free images for inference.
To run inference on your own data,
convert them into the OME-Zarr data format using iohub or other
tools,
and run pre-processing
with the viscy preprocess CLI.
Setup
The commands below will install the required packages and download the example dataset and model checkpoint. It may take a few minutes to download all the files.
Setup Google Colab
To run this quick-start guide using Google Colab, choose the 'T4' GPU runtime from the "Connect" dropdown menu in the upper-right corner of this notebook for faster execution. Using a GPU significantly speeds up running model inference, but CPU compute can also be used.
Setup Local Environment
The commands below assume a Unix-like shell with wget installed.
On Windows, the files can be downloaded manually from the URLs.
# Install VisCy with the optional dependencies for this example
# See the [repository](https://github.com/mehta-lab/VisCy) for more details
!pip install "viscy[metrics,visual]==0.4.0a3"# restart kernel if running in Google Colab
if "get_ipython" in globals():
session = get_ipython()
if "google.colab" in str(session):
print("Shutting down colab session.")
session.kernel.do_shutdown(restart=True)# Validate installation
!viscy --help# Download the example dataset
!wget -m -np -nH --cut-dirs=5 -R "index.html*" "https://public.czbiohub.org/comp.micro/viscy/VS_datasets/VSCyto2D/test/a549_hoechst_cellmask_test.zarr/"
# Download the model checkpoint
!wget https://public.czbiohub.org/comp.micro/viscy/VS_models/VSCyto2D/VSCyto2D/epoch=399-step=23200.ckptRun Model Inference
The following code will run inference on a single field of view (FOV) of the example dataset. This can also be achieved by using the VisCy CLI.
from pathlib import Path

from iohub import open_ome_zarr
from torchview import draw_graph

from viscy.data.hcs import HCSDataModule
from viscy.trainer import VisCyTrainer
from viscy.transforms import NormalizeSampled
from viscy.translation.engine import FcmaeUNet
from viscy.translation.predict_writer import HCSPredictionWriter# NOTE: Nothing needs to be changed in this code block for the example to work.
# If using your own data, please modify the paths below.
# TODO: Set download paths, by default the working directory is used
root_dir = Path()
# TODO: modify the path to the input dataset
input_data_path = root_dir / "a549_hoechst_cellmask_test.zarr"
# TODO: modify the path to the model checkpoint
model_ckpt_path = root_dir / "epoch=399-step=23200.ckpt"
# TODO: modify the path to save the predictions
output_path = root_dir / "a549_prediction.zarr"
# TODO: Choose an FOV
fov = "0/0/0"# Configure the data module for loading example images in prediction mode.
# See API documentation for how to use it with a different dataset.
# For example, View the documentation for the HCSDataModule class by running:
?HCSDataModuleOutput:
Init signature: HCSDataModule(*args, **kwargs)
Docstring:
Lightning data module for a preprocessed HCS NGFF Store.
Parameters
----------
data_path : str
Path to the data store.
source_channel : str or Sequence[str]
Name(s) of the source channel, e.g. 'Phase'.
target_channel : str or Sequence[str]
Name(s) of the target channel, e.g. ['Nuclei', 'Membrane'].
z_window_size : int
Z window size of the 2.5D U-Net, 1 for 2D.
split_ratio : float, optional
Split ratio of the training subset in the fit stage,
e.g. 0.8 means an 80/20 split between training/validation,
by default 0.8.
batch_size : int, optional
Batch size, defaults to 16.
num_workers : int, optional
Number of data-loading workers, defaults to 8.
target_2d : bool, optional
Whether the target is 2D (e.g. in a 2.5D model),
defaults to False.
yx_patch_size : tuple[int, int], optional
Patch size in (Y, X), defaults to (256, 256).
normalizations : list of MapTransform, optional
MONAI dictionary transforms applied to selected channels,
defaults to ``[]`` (no normalization).
augmentations : list of MapTransform, optional
MONAI dictionary transforms applied to the training set,
defaults to ``[]`` (no augmentation).
caching : bool, optional
Whether to decompress all the images and cache the result,
will store in `/tmp/$SLURM_JOB_ID/` if available,
defaults to False.
ground_truth_masks : Path or None, optional
Path to the ground truth masks,
used in the test stage to compute segmentation metrics,
defaults to None.
persistent_workers : bool, optional
Whether to keep the workers alive between fitting epochs,
defaults to False.
prefetch_factor : int or None, optional
Number of samples loaded in advance by each worker during fitting,
defaults to None (2 per PyTorch default).
array_key : str, optional
Name of the image arrays (multiscales level), by default "0"
Init docstring:
Attributes:
prepare_data_per_node:
If True, each LOCAL_RANK=0 will call prepare data.
Otherwise only NODE_RANK=0, LOCAL_RANK=0 will prepare data.
allow_zero_length_dataloader_with_multiple_devices:
If True, dataloader with zero length within local rank is allowed.
Default value is False.
File: /usr/local/lib/python3.12/dist-packages/viscy/data/hcs.py
Type: type
Subclasses: TripletDataModule# Setup the data module to use the example dataset
data_module = HCSDataModule(
# Path to HCS or Single-FOV OME-Zarr dataset
data_path=input_data_path / fov,
# Name of the input phase channel
source_channel="Phase3D",
# Desired name of the output channels
target_channel=["Membrane", "Nuclei"],
# Axial input size, 1 for 2D models
z_window_size=1,
# Batch size
# Adjust based on available memory (reduce if seeing OOM errors)
batch_size=8,
# Number of workers for data loading
# Set to 0 for Windows and macOS if running in a notebook,
# since multiprocessing only works with a `if __name__ == '__main__':` guard.
# On Linux, set it based on available CPU cores to maximize performance.
num_workers=4,
# Normalization strategy
# This one uses pre-computed statistics from `viscy preprocess`
# to subtract the median and divide by the interquartile range (IQR).
# It can also be replaced by other MONAI transforms.
normalizations=[
NormalizeSampled(
["Phase3D"],
level="fov_statistics",
subtrahend="median",
divisor="iqr",
)
],
)# Load the VSCyto2D model from the downloaded checkpoint
# VSCyto2D is fine-tuned from a FCMAE-pretrained UNeXt2 model.
# See this module for options to configure the model:
from viscy.unet.networks.fcmae import FullyConvolutionalMAE
?FullyConvolutionalMAEOutput:
Init signature: FullyConvolutionalMAE(self, *args, **kwargs)
Docstring:
Base class for all neural network modules.
Your models should also subclass this class.
Modules can also contain other Modules, allowing them to be nested in
a tree structure. You can assign the submodules as regular attributes::
import torch.nn as nn
import torch.nn.functional as F
class Model(nn.Module):
def __init__(self) -> None:
super().__init__()
self.conv1 = nn.Conv2d(1, 20, 5)
self.conv2 = nn.Conv2d(20, 20, 5)
def forward(self, x):
x = F.relu(self.conv1(x))
return F.relu(self.conv2(x))
Submodules assigned in this way will be registered, and will also have their
parameters converted when you call :meth:`to`, etc.
.. note::
As per the example above, an ``__init__()`` call to the parent class
must be made before assignment on the child.
:ivar training: Boolean represents whether this module is in training or
evaluation mode.
:vartype training: bool
Init docstring: Initialize internal Module state, shared by both nn.Module and ScriptModule.
File: /usr/local/lib/python3.12/dist-packages/viscy/unet/networks/fcmae.py
Type: type
Subclasses:vs_cyto_2d = FcmaeUNet.load_from_checkpoint(
# checkpoint path
model_ckpt_path,
model_config={
# number of input channels
# must match the number of channels in the input data
"in_channels": 1,
# number of output channels
# must match the number of target channels in the data module
"out_channels": 2,
# number of ConvNeXt v2 blocks in each stage of the encoder
"encoder_blocks": [3, 3, 9, 3],
# feature map channels in each stage of the encoder
"dims": [96, 192, 384, 768],
# number of ConvNeXt v2 blocks in each stage of the decoder
"decoder_conv_blocks": 2,
# kernel size in the stem layer
"stem_kernel_size": [1, 2, 2],
# axial size of the input image
# must match the Z-window size in the data module
"in_stack_depth": 1,
# whether to perform masking (for FCMAE pre-training)
"pretraining": False,
},
)# Visualize the model graph
model_graph = draw_graph(
vs_cyto_2d,
(vs_cyto_2d.example_input_array),
graph_name="VSCyto2D",
roll=True,
depth=3,
expand_nested=True,
)
model_graph.visual_graph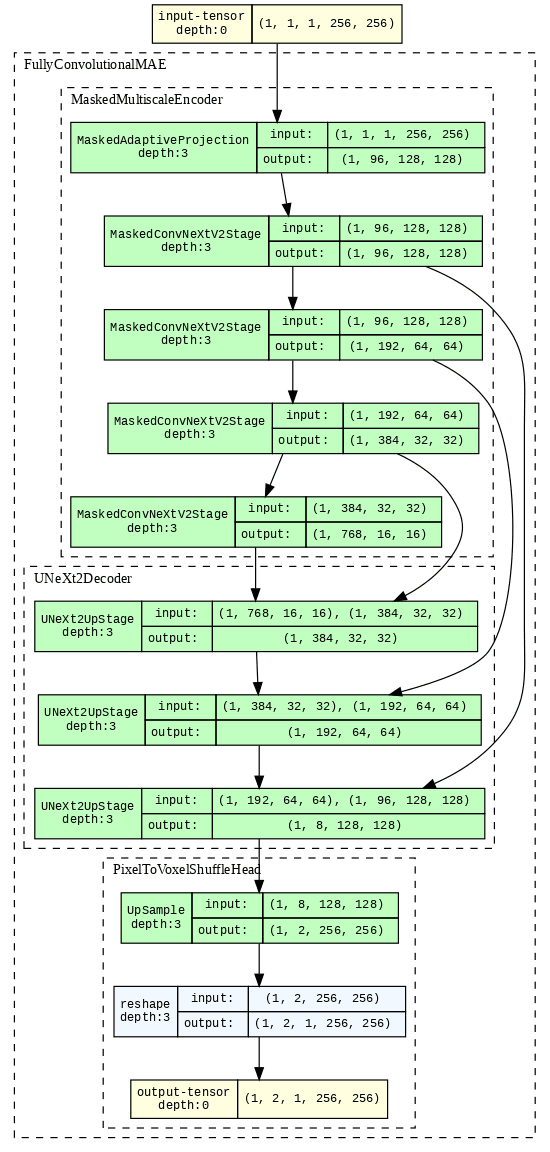
# Setup the trainer for prediction
# The trainer can be further configured to better utilize the available hardware,
# for example using GPUs and half precision.
# Callbacks can also be used to customize logging and prediction writing.
# See the API documentation for more details:
?VisCyTrainerOutput:
Init signature: VisCyTrainer(*args, **kwargs)
Docstring: <no docstring>
Init docstring:
Customize every aspect of training via flags.
Args:
accelerator: Supports passing different accelerator types ("cpu", "gpu", "tpu", "hpu", "mps", "auto")
as well as custom accelerator instances.
strategy: Supports different training strategies with aliases as well custom strategies.
Default: ``"auto"``.
devices: The devices to use. Can be set to a positive number (int or str), a sequence of device indices
(list or str), the value ``-1`` to indicate all available devices should be used, or ``"auto"`` for
automatic selection based on the chosen accelerator. Default: ``"auto"``.
num_nodes: Number of GPU nodes for distributed training.
Default: ``1``.
precision: Double precision (64, '64' or '64-true'), full precision (32, '32' or '32-true'),
16bit mixed precision (16, '16', '16-mixed') or bfloat16 mixed precision ('bf16', 'bf16-mixed').
Can be used on CPU, GPU, TPUs, or HPUs.
Default: ``'32-true'``.
logger: Logger (or iterable collection of loggers) for experiment tracking. A ``True`` value uses
the default ``TensorBoardLogger`` if it is installed, otherwise ``CSVLogger``.
``False`` will disable logging. If multiple loggers are provided, local files
(checkpoints, profiler traces, etc.) are saved in the ``log_dir`` of the first logger.
Default: ``True``.
callbacks: Add a callback or list of callbacks.
Default: ``None``.
fast_dev_run: Runs n if set to ``n`` (int) else 1 if set to ``True`` batch(es)
of train, val and test to find any bugs (ie: a sort of unit test).
Default: ``False``.
max_epochs: Stop training once this number of epochs is reached. Disabled by default (None).
If both max_epochs and max_steps are not specified, defaults to ``max_epochs = 1000``.
To enable infinite training, set ``max_epochs = -1``.
min_epochs: Force training for at least these many epochs. Disabled by default (None).
max_steps: Stop training after this number of steps. Disabled by default (-1). If ``max_steps = -1``
and ``max_epochs = None``, will default to ``max_epochs = 1000``. To enable infinite training, set
``max_epochs`` to ``-1``.
min_steps: Force training for at least these number of steps. Disabled by default (``None``).
max_time: Stop training after this amount of time has passed. Disabled by default (``None``).
The time duration can be specified in the format DD:HH:MM:SS (days, hours, minutes seconds), as a
:class:`datetime.timedelta`, or a dictionary with keys that will be passed to
:class:`datetime.timedelta`.
limit_train_batches: How much of training dataset to check (float = fraction, int = num_batches).
Value is per device. Default: ``1.0``.
limit_val_batches: How much of validation dataset to check (float = fraction, int = num_batches).
Value is per device. Default: ``1.0``.
limit_test_batches: How much of test dataset to check (float = fraction, int = num_batches).
Value is per device. Default: ``1.0``.
limit_predict_batches: How much of prediction dataset to check (float = fraction, int = num_batches).
Value is per device. Default: ``1.0``.
overfit_batches: Overfit a fraction of training/validation data (float) or a set number of batches (int).
Default: ``0.0``.
val_check_interval: How often to check the validation set. Pass a ``float`` in the range [0.0, 1.0] to check
after a fraction of the training epoch. Pass an ``int`` to check after a fixed number of training
batches. An ``int`` value can only be higher than the number of training batches when
``check_val_every_n_epoch=None``, which validates after every ``N`` training batches
across epochs or during iteration-based training. Additionally, accepts a time-based duration
as a string "DD:HH:MM:SS", a :class:`datetime.timedelta`, or a dict of kwargs to
:class:`datetime.timedelta`. When time-based, validation triggers once the elapsed wall-clock time
since the last validation exceeds the interval; the check occurs after the current batch
completes, the validation loop runs, and the timer is reset.
Default: ``1.0``.
check_val_every_n_epoch: Perform a validation loop after every `N` training epochs. If ``None``,
validation will be done solely based on the number of training batches, requiring ``val_check_interval``
to be an integer value. When used together with a time-based ``val_check_interval`` and
``check_val_every_n_epoch`` > 1, validation is aligned to epoch multiples: if the interval elapses
before the next multiple-N epoch, validation runs at the start of that epoch (after the first batch)
and the timer resets; if it elapses during a multiple-N epoch, validation runs after the current batch.
For ``None`` or ``1`` cases, the time-based behavior of ``val_check_interval`` applies without
additional alignment.
Default: ``1``.
num_sanity_val_steps: Sanity check runs n validation batches before starting the training routine.
Set it to `-1` to run all batches in all validation dataloaders.
Default: ``2``.
log_every_n_steps: How often to log within steps.
Default: ``50``.
enable_checkpointing: If ``True``, enable checkpointing.
It will configure a default ModelCheckpoint callback if there is no user-defined ModelCheckpoint in
:paramref:`~lightning.pytorch.trainer.trainer.Trainer.callbacks`.
Default: ``True``.
enable_progress_bar: Whether to enable to progress bar by default.
Default: ``True``.
enable_model_summary: Whether to enable model summarization by default.
Default: ``True``.
accumulate_grad_batches: Accumulates gradients over k batches before stepping the optimizer.
Default: 1.
gradient_clip_val: The value at which to clip gradients. Passing ``gradient_clip_val=None`` disables
gradient clipping. If using Automatic Mixed Precision (AMP), the gradients will be unscaled before.
Default: ``None``.
gradient_clip_algorithm: The gradient clipping algorithm to use. Pass ``gradient_clip_algorithm="value"``
to clip by value, and ``gradient_clip_algorithm="norm"`` to clip by norm. By default it will
be set to ``"norm"``.
deterministic: If ``True``, sets whether PyTorch operations must use deterministic algorithms.
Set to ``"warn"`` to use deterministic algorithms whenever possible, throwing warnings on operations
that don't support deterministic mode. If not set, defaults to ``False``. Default: ``None``.
benchmark: The value (``True`` or ``False``) to set ``torch.backends.cudnn.benchmark`` to.
The value for ``torch.backends.cudnn.benchmark`` set in the current session will be used
(``False`` if not manually set). If :paramref:`~lightning.pytorch.trainer.trainer.Trainer.deterministic`
is set to ``True``, this will default to ``False``. Override to manually set a different value.
Default: ``None``.
inference_mode: Whether to use :func:`torch.inference_mode` or :func:`torch.no_grad` during
evaluation (``validate``/``test``/``predict``).
use_distributed_sampler: Whether to wrap the DataLoader's sampler with
:class:`torch.utils.data.DistributedSampler`. If not specified this is toggled automatically for
strategies that require it. By default, it will add ``shuffle=True`` for the train sampler and
``shuffle=False`` for validation/test/predict samplers. If you want to disable this logic, you can pass
``False`` and add your own distributed sampler in the dataloader hooks. If ``True`` and a distributed
sampler was already added, Lightning will not replace the existing one. For iterable-style datasets,
we don't do this automatically.
profiler: To profile individual steps during training and assist in identifying bottlenecks.
Default: ``None``.
detect_anomaly: Enable anomaly detection for the autograd engine.
Default: ``False``.
barebones: Whether to run in "barebones mode", where all features that may impact raw speed are
disabled. This is meant for analyzing the Trainer overhead and is discouraged during regular training
runs. The following features are deactivated:
:paramref:`~lightning.pytorch.trainer.trainer.Trainer.enable_checkpointing`,
:paramref:`~lightning.pytorch.trainer.trainer.Trainer.logger`,
:paramref:`~lightning.pytorch.trainer.trainer.Trainer.enable_progress_bar`,
:paramref:`~lightning.pytorch.trainer.trainer.Trainer.log_every_n_steps`,
:paramref:`~lightning.pytorch.trainer.trainer.Trainer.enable_model_summary`,
:paramref:`~lightning.pytorch.trainer.trainer.Trainer.num_sanity_val_steps`,
:paramref:`~lightning.pytorch.trainer.trainer.Trainer.fast_dev_run`,
:paramref:`~lightning.pytorch.trainer.trainer.Trainer.detect_anomaly`,
:paramref:`~lightning.pytorch.trainer.trainer.Trainer.profiler`,
:meth:`~lightning.pytorch.core.LightningModule.log`,
:meth:`~lightning.pytorch.core.LightningModule.log_dict`.
plugins: Plugins allow modification of core behavior like ddp and amp, and enable custom lightning plugins.
Default: ``None``.
sync_batchnorm: Synchronize batch norm layers between process groups/whole world.
Default: ``False``.
reload_dataloaders_every_n_epochs: Set to a positive integer to reload dataloaders every n epochs.
Default: ``0``.
default_root_dir: Default path for logs and weights when no logger/ckpt_callback passed.
Default: ``os.getcwd()``.
Can be remote file paths such as `s3://mybucket/path` or 'hdfs://path/'
enable_autolog_hparams: Whether to log hyperparameters at the start of a run.
Default: ``True``.
model_registry: The name of the model being uploaded to Model hub.
Raises:
TypeError:
If ``gradient_clip_val`` is not an int or float.
MisconfigurationException:
If ``gradient_clip_algorithm`` is invalid.
File: /usr/local/lib/python3.12/dist-packages/viscy/trainer.py
Type: type
Subclasses:# Initialize the trainer
# The prediction writer callback will save the predictions to an OME-Zarr store
trainer = VisCyTrainer(callbacks=[HCSPredictionWriter(output_path)])
# Run prediction
trainer.predict(model=vs_cyto_2d, datamodule=data_module, return_predictions=False)Model Outputs
The model outputs are also stored in an OME-Zarr store. They can be visualized in an image viewer such as napari. Below we show a snapshot in the notebook.
# Read images from Zarr stores
# Choose the ROI for better visualization
y_slice = slice(0, 512)
x_slice = slice(0, 512)

# Open the prediction store and get the 2D images from 5D arrays (t,c,z,y,x)
with open_ome_zarr(output_path / fov) as vs_store:
    vs_nucleus = vs_store[0][0, 0, 0, y_slice, x_slice]
    vs_membrane = vs_store[0][0, 1, 0, y_slice, x_slice]

# Open the experimental fluorescence dataset
with open_ome_zarr(input_data_path / fov) as fluor_store:
    fluor_nucleus = fluor_store[0][0, 1, 0, y_slice, x_slice]
fluor_membrane = fluor_store[0][0, 2, 0, y_slice, x_slice]# Plot
import matplotlib.pyplot as plt
import numpy as np
from cmap import Colormap
from skimage.exposure import rescale_intensity
def render_rgb(image: np.ndarray, colormap: Colormap):
image = rescale_intensity(image, out_range=(0, 1))
image = colormap(image)
return image
# Render the images as RGB in false colors
vs_nucleus_rgb = render_rgb(vs_nucleus, Colormap("bop_blue"))
vs_membrane_rgb = render_rgb(vs_membrane, Colormap("bop_orange"))
merged_vs = (vs_nucleus_rgb + vs_membrane_rgb).clip(0, 1)
fluor_nucleus_rgb = render_rgb(fluor_nucleus, Colormap("green"))
fluor_membrane_rgb = render_rgb(fluor_membrane, Colormap("magenta"))
merged_fluor = (fluor_nucleus_rgb + fluor_membrane_rgb).clip(0, 1)
# Plot
# Show the individual channels and then fused in a grid
fig, ax = plt.subplots(2, 3, figsize=(15, 10))
# Virtual staining plots
ax[0, 0].imshow(vs_nucleus_rgb)
ax[0, 0].set_title("VS Nuclei")
ax[0, 1].imshow(vs_membrane_rgb)
ax[0, 1].set_title("VS Membrane")
ax[0, 2].imshow(merged_vs)
ax[0, 2].set_title("VS Nuclei+Membrane")
# Experimental fluorescence plots
ax[1, 0].imshow(fluor_nucleus_rgb)
ax[1, 0].set_title("Experimental Fluorescence Nuclei")
ax[1, 1].imshow(fluor_membrane_rgb)
ax[1, 1].set_title("Experimental Fluorescence Membrane")
ax[1, 2].imshow(merged_fluor)
ax[1, 2].set_title("Experimental Fluorescence Nuclei+Membrane")
# turnoff axis
for a in ax.flatten():
a.axis("off")
plt.tight_layout()
plt.show()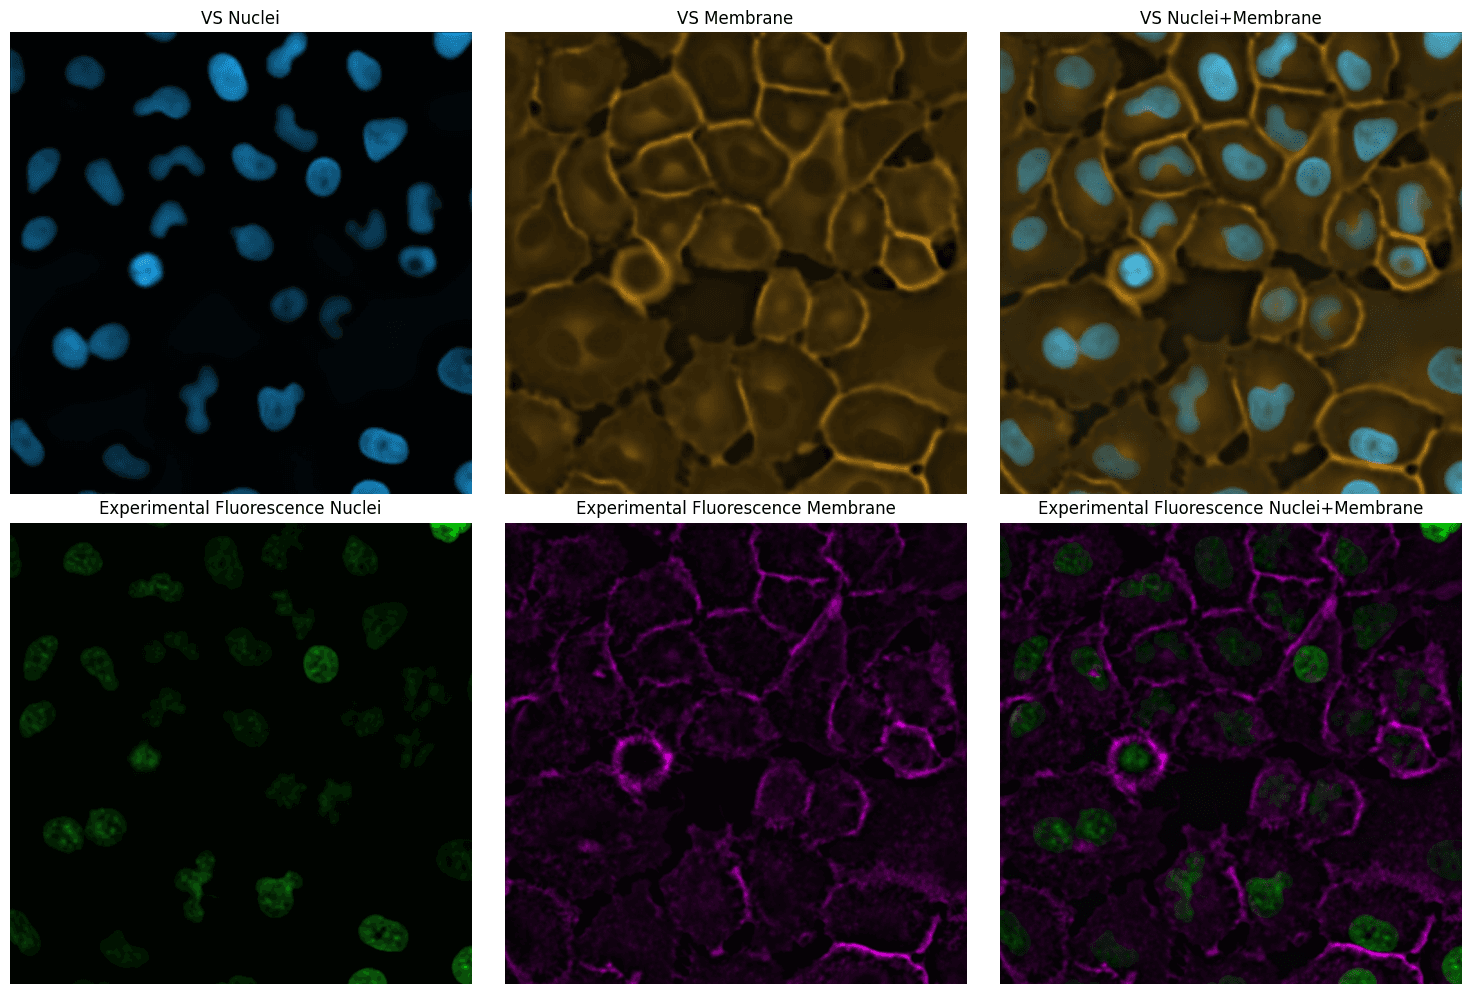
Responsible Use
We are committed to advancing the responsible development and use of artificial intelligence. Please follow our Acceptable Use Policy when engaging with our services.
Should you have any security or privacy issues or questions related to the services, please reach out to our team at security@chanzuckerberg.com or privacy@chanzuckerberg.com respectively.